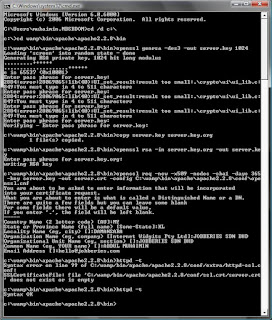
 I tested this out with Windows Vista. Hopefully this will help you to those using Vista
Step1 -> Create SSL Certificate and Key
1) Open the DOS command window and change directory to bin directory of wamp apache directory by using the DOS command without quotes:
"cd /d c:\"
and then
"cd wamp\bin\apache\apache2.2.8\bin"
Apache2.2.8 should be changed to what apache folder your wamp server has.
After done, the DOS prompt should look like:
C:\wamp\bin\apache\apache2.2.8\bin>
2) Create a server key with 1024 bits encryption. You should enter this command without quotes:
"openssl genrsa -des3 -out server.key 1024"
It'll ask you a pass phrase, just enter anything you want.
3) Remove the pass phrase from the RSA private key (while keeping a backup copy of the original file). Enter this command without quotes:
"copy server.key server.key.org"
and then
"openssl rsa -in server.key.org -out server.key"
It'll ask you the pass phrase, just type anything or same as above.
1d) Create a self-signed Certificate (X509 structure) with the RSA key you just created. Enter the command without quotes:
"openssl req -new -x509 -nodes -sha1 -days 365 -key server.key -out server.crt -config C:\wamp\bin\apache\apache2.2.8\conf\openssl.cnf"
You'll fill in the information after entering this command. The correct location of config file, openssl.cnf may need to be changed. In windows, you won't see ".cnf" extension of the file openssl, but in DOS you'll see the full name openssl.cnf (With Windows Vista the extension appear if you turn on the option in the file option).
Step2 -> Copy the server.key and server.crt files.
1) In the conf folder of apache2.2.8 folder, create two folders named as ssl.key and ssl.crt
2) copy the server.key file to ssl.key folder and server.crt file to ssl.crt
Step3 -> Edit the httpd.conf file and php.ini
1) In httpd.conf file, remove the comment ('#') at the line which says:
LoadModule ssl_module modules/mod_ssl.so
2) In httpd.conf, remove the comment ('#') at the line which says:
Include conf/extra/httpd_ssl.conf
Then move that line after this block
<IfModule ssl_module>.... </ifmodule>3) open the php.ini file located in C:/wamp/bin/apache/apache2.2.8/bin/ folder, remove the comment ';' at the line which says:
extension=php_openssl.dll
Step4 -> Edit the httpd_ssl.conf file in the folder C:\wamp\bin\apache\apache2.2.8\conf\extra
1) Find the line which says "SSLMutex ...." and change it to
"SSLMutex default"
without quotes
2) Find the line which says:
<VirtualHost _default_:443>. Right after it, change the line which says"DocumentRoot ..."
to
DocumentRoot "C:/wamp/www/" with quotes.
Change the line
"ErrorLog...." to
Errorlog logs/sslerror_log
Change the line
"TransferLog ...." to TransferLog logs/sslaccess_log
3) SSL crt file: Change the line "SSLCertificateFile ...." to SSLCertificateFile "conf/ssl.crt/server.crt"
4) SSL key file: Change the line
"SSLCertificateKeyFile ...."
to
SSLCertificateKeyFile "conf/ssl.key/server.key"
5) Change the line which says
<Directory "C:/Program Files/Apache Software Foundation/Apache2.2/cgi-bin"> or something similar to <directory>...</directory> tags:Options Indexes FollowSymLinks MultiViews
AllowOverride All
Order allow,deny
allow from all
6) Make sure the line
CustomLog "logs/ssl_request_log" \
is uncommented (remove the #).
Step5
In the previous DOS Command windows, enter httpd -t . If it displays Sysntax is OK, then
************** go to Step 6. If not, then correct the wrong syntax and redo step 5.
Step6 -> Restart the Apache server
Step7-> if restart is successful, then open the browser and enter "https://localhost" without quotes.
Step8 (Optional) -> If you want to allow world wide web access to your HTTPS secure server, then in the httpd_ssl.conf file, change the line which says
'ServerName localhost:443'
to
'ServerName www.yourwebsitename.com:443'
without quotes. yourwebsitename is your registered internet domain name. If you don't have it, then just use your WAN IP address. For example
'ServerName 99.238.53.105:443'
Make sure these setups are correct to allow outside access to secured www server.
The DocumentRoot you modified in step 4b points to the correct website folder on your
computer.
If your computer's connected to the router, setup the router to allow port 443 forwarding to your
computer.
If your computer has a firewall enabled or behind a network firewall, set up the firewall to allow
incoming port 443 connection.
Read More

